
Substance Menu Settings
Double-click the Substance node to access the Substance menu.
Texture Menu
The Texture menu contains settings related to the selection and resolution of the texture.
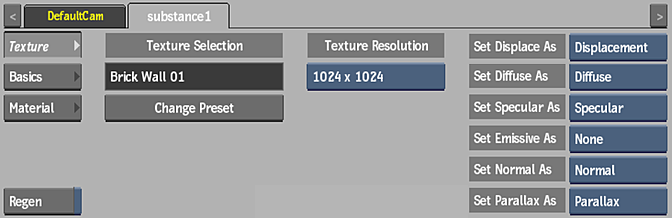
Preset Name field
This locked field displays the name of the current preset.
Change Preset
Click to open the file browser to select a different preset.
Texture Resolution option
Select the resolution of the pattern.
Lock Width and Height
Enable to lock the texture resolution width and height. Disable to be able to select different width and height values. Available when using third-party Substance Textures or the Substance Materialize node.
Not shown in the screenshot above.
Texture Resolution Width option
Select the width resolution of the pattern. Available if Lock Width And Height is disabled.
Not shown in the screenshot above.
Texture Resolution Height option
Select the height resolution of the pattern. Available if Lock Width And Height is disabled.
Not shown in the screenshot above.
Set Displace As option
Select a map to be used as the Displace pass. This is useful if you want to rewire one of the maps in the substance (such as the Bump map), that might be invisible, to be seen explicitly.
Set Diffuse As option
Select a map to be used as the Diffuse pass. This is useful if you want to rewire one of the maps in the substance (such as the Bump map), that might be invisible, to be seen explicitly.
Set Specular As option
Select a map to be used as the Specular pass. This is useful if you want to rewire one of the maps in the preset (such as the Bump map), that might be invisible, to be seen explicitly.
Set Emissive As option
Select a map to be used as the Emissive pass. This is useful if you want to rewire one of the maps in the preset (such as the Bump map), that might be invisible, to be seen explicitly.
Set Normal As option
Select a map to be used as the Normal pass. This is useful if you want to rewire one of the maps in the preset (such as the Bump map), that might be invisible, to be seen explicitly.
Set Parallax As option
Select a map to be used as the Parallax pass. This is useful if you want to rewire one of the maps in the preset (such as the Bump map), that might be invisible, to be seen explicitly.
Regen
Enable to dynamically refresh the image as changes are made to the settings. If you notice a slowdown in interactivity, disable Regen.
Basics Menu
The Basics menu contains settings common to all Substance presets. Settings that are not applicable to a specific preset are greyed out.
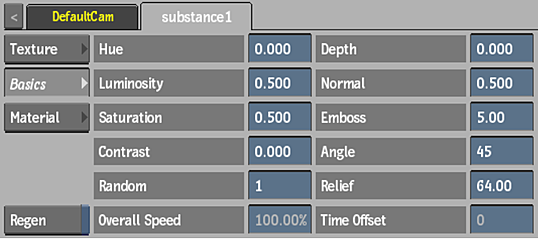
Hue field
Displays the colour range of the texture.
Luminosity field
Displays the brightness level of the texture.
Saturation field
Displays the level of colour purity of the texture.
Contrast field
Displays the gradations between the light and dark areas of the texture.
Random field
Displays the random seed value of the generated texture.
Depth field
Displays the attenuation of depth of the texture.
Normal field
Displays the attenuation of the normals of the texture.
Emboss field
Displays the level of enhanced details of the texture.
Angle field
Displays the angle of diffuse in relation to the level of Emboss applied to the texture.
Relief field
Displays the frequency of surface detail between attached Parallax and Displacement maps.
Overall Speed field
Displays the rate at which the animation plays.
Time Offset field
Displays the start point of the animation. With a value of 0, the animation starts at frame 1. With a value of 100, the animation begins as if it has been generating for 99 frames. You cannot animate this field.
Setting Menu
The settings in the Material menu vary depending on the preset chosen.
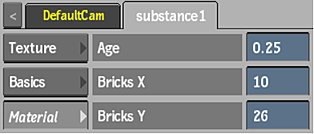
For example, the Material settings for the BrickWall01 preset allow you to age the bricks, and alter the number of the bricks on the X and Y axes.
Some presets include a Flow field in the Material settings. Animate the Flow field to create a motion behaviour specific to the preset.