
The network consists of nodes and links, each with many associated data values. Any of these values can be edited using the
 tool (as shown
here). This topic demonstrates some of the other editing tools available in
InfoWorks WS Pro. You can use
grid views and property sheets to edit object data or edit data flags.
tool (as shown
here). This topic demonstrates some of the other editing tools available in
InfoWorks WS Pro. You can use
grid views and property sheets to edit object data or edit data flags.
This topic demonstrates a few of the GeoPlan editing tools allowing you to perform a large variety of actions and uses the example network to illustrate on specific links or nodes how to use the software:
Using flags to indicate the source of your data
Moving nodes
Adding link bends
Reversing links
To begin:
- Right-click the 'Newtown to Edit' network and select
Open.
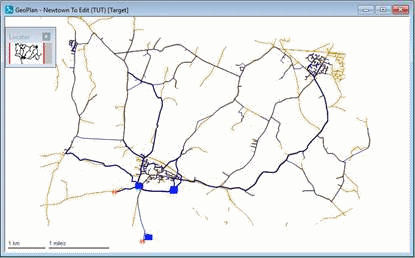
The network is displayed.
- Enlarge the GeoPlan window if necessary.
Using flags to indicate the source of your data
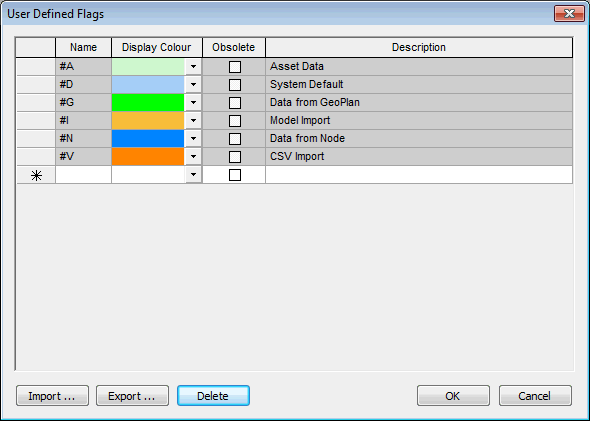
- Every item of network data has an associated data flag, which tells you something about how the data was derived. The network already has a number of flags, but in this topic a new flag will be applied to all edited data:
- Select
File
 Database settings User defined flags.
- Click the blank cell at the bottom of the Name column and type in an appropriate flag name ('ED' in the screenshot below, but beware that the 'ED' flag may already exist on this tutorial database so it is best to create and use your own flag for the purpose of this tutorial), e.g. two capital letters.
- Click the drop-down list in the Display Colour column and select pale green for example.
- Type 'Edited data' in the Description column.
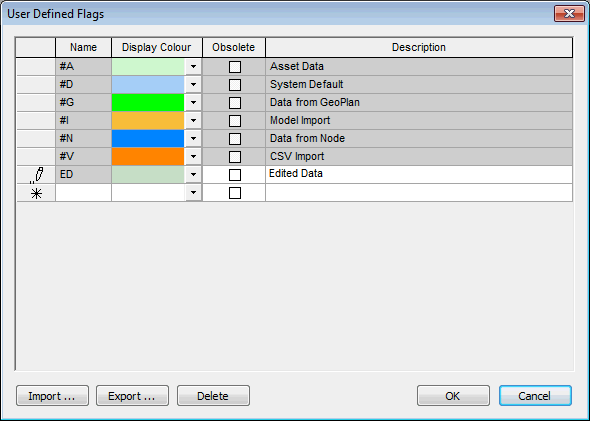
- Click OK.
- Set the new flag to be the flag for all editing changes by clicking the
 (Use edit flag) tool on the Edit toolbar and selecting the new flag name in the drop-down box to the right.
Any data you now change in a properties window or grid view will automatically have the edited flag attached. Other changes - for example those made with the Move Nodes tool - will not necessarily be given this flag.
(Use edit flag) tool on the Edit toolbar and selecting the new flag name in the drop-down box to the right.
Any data you now change in a properties window or grid view will automatically have the edited flag attached. Other changes - for example those made with the Move Nodes tool - will not necessarily be given this flag.
- The subsequent sections demonstrate how to manually edit the flags for edited data (this is necessary if the instructions detailed in the bullet point above have not been followed).
- Select
File
Moving nodes
In InfoWorks WS Pro, it is very easy to move nodes that have been misplaced for some reason. In our example network:
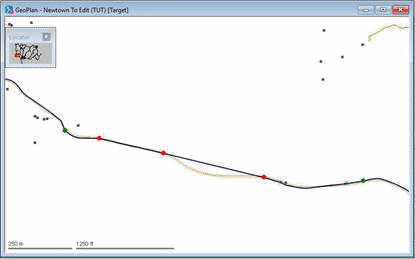
- The network contains some nodes that are in the wrong location. These are available as a selection list. These nodes need to be moved:
- Use the GeoPlan layer control to turn on the display of roads.
- Drag the 'Nodes to be Moved' selection list from the Model Group window to the GeoPlan View to select the nodes that require editing.
- Right click in the GeoPlan View and select Find selection from the popup menu to zoom in on run of nodes K350229, K350390 and K350228.
- The nodes are in the wrong place; they should be in line with the road. The positions for the whole group can be corrected at the same time.
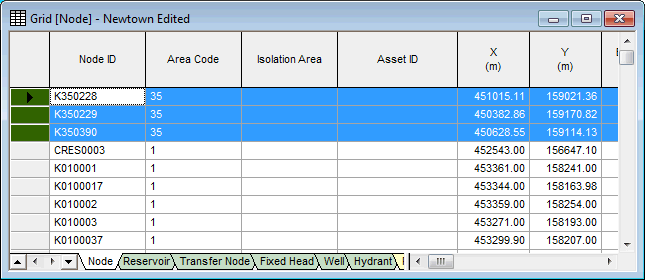
- Select
Selection Selection operations Geographically adjust selection.
- The X and Y co-ordinates of the nodes needs to be adjusted to be 50 metres less in each case. In the Geographical Adjustment Of Selection dialog, type '-50' in the right-hand boxes.
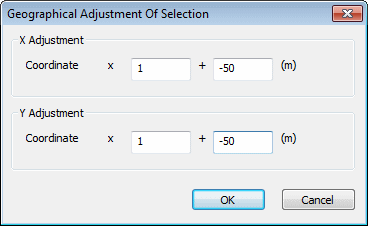
- Click
OK. The nodes are moved to their new positions. (Note that changes made with the
Geographically adjust selection
option do not have the edit flag applied).
Individual nodes can be moved using the Move Nodes
 tool. Click the node in the GeoPlan view, move the pointer as close as possible to the correct co-ordinates, then click to transfer the node (do not hold down the mouse button).
- Change the data flags for the nodes that have been moved, as follows:
- From the
Window menu, choose
Grid windows | New nodes window. The Nodes grid view is displayed, showing full details of all nodes in the network. Select
Grid | Group network selections at top of grid. The selected nodes are shown at the top of the grid.
You can also open the Nodes grid view by clicking the
 (New Nodes Window) toolbar button.
- From the
Window menu, choose
Grid windows | New nodes window. The Nodes grid view is displayed, showing full details of all nodes in the network. Select
Grid | Group network selections at top of grid. The selected nodes are shown at the top of the grid.
You can also open the Nodes grid view by clicking the
- Maximise the grid view.
- Drag the pointer over the selected cells in the
X and
Y columns.
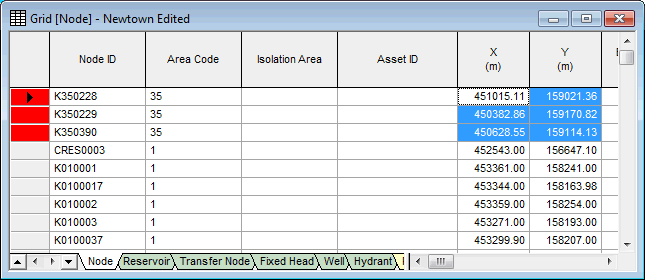
- Right-click the selection, choose
Flags, then select the name representing your edited flag. The background for those cells changes to pale green.

- Close the grid.
- Use the GeoPlan layer control to turn on the display of roads.
Adding link bends
InfoWorks WS Pro allows you to edit link bends. Links in the model can have bends on the GeoPlan view so they can more closely follow their actual physical position when building a geographically accurate model.
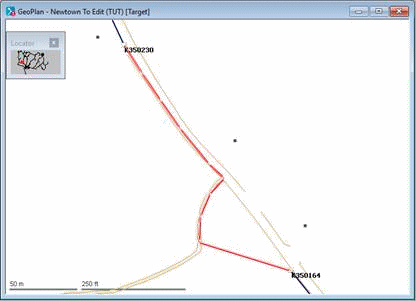
- Let us now take the example of a link that needs to have bends added in our example network.
- In our example, the link that needs to be edited is in a selection list:
- Drag the 'Links to be Edited' selection list from the Model Group window to the GeoPlan view.
- Right-click the GeoPlan view and select Find selection from the context menu to zoom in to link K350164.K350230.1.
- The pipe must be modified so that it follows the line of the road.
- Click the
 (Edit Link Bends) button, hold down
Ctrl
and click the link in two places to add bend points. Click each of the bend points (without
Ctrl
) and drag them to suitable positions.
To remove an intermediate bend point press Altand click.
(Edit Link Bends) button, hold down
Ctrl
and click the link in two places to add bend points. Click each of the bend points (without
Ctrl
) and drag them to suitable positions.
To remove an intermediate bend point press Altand click.
- Click the
(Properties) button and then the link. On the properties sheet, the length is no longer accurate, so change the data flag to #D. The length will have been adjusted. Change its data flag to your edited flag name.
If you do not set the data flag to #D, the Length field must be updated manually.

Reversing links
InfoWorks WS Pro allows you to reverse link direction if it is incorrect. The Trace Links Upstream and Trace Links Downstream tools allow you to check on the flow direction in your network.
- The direction of a link near transfer node K470029 is incorrect and needs to be reversed:
- Use Find network to display the whole network.
- Clear any selection if required.
- Zoom in on the region above the transfer node. Link K470021.K470030.1 is in the wrong direction and should be in the direction of flow towards transfer node K470029. (You can check this by clicking the
button and by selecting the link to display its property sheet.)
- Select the incorrect link.
- From the
Selection menu, choose
Selection operations | Reverse links, or click the
 (Reverse all selected links) button.
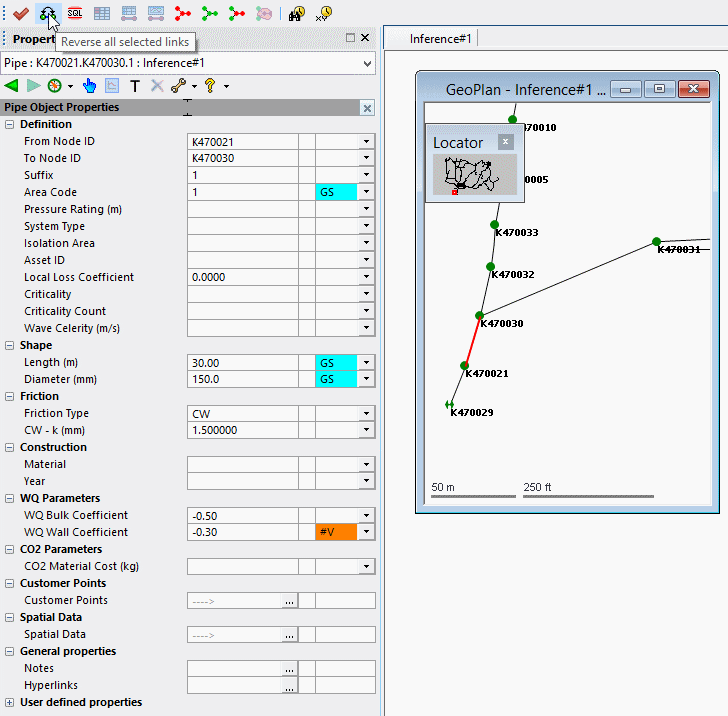
- The ID of the link is changed accordingly.
Commit the edited network:
- In the Model Group window, right-click the icon of the network and select Commit changes to database.
- No need to validate the network.
- The edited network is committed (the icon for the new version of the network no longer has a red exclamation).
- Close the GeoPlan view.
 Back to flowchart

Managing version controlled objects
Creating user defined data flags
Editing Network Object Data