(Optional) Incorporate the Change Management template into your Fusion Manage site
Fusion Manage requires a separate license and can be used with Fusion or independently. Learn more.
If your connected Fusion Manage site only contains the Components, Drawings, and Change Orders (CO) workspaces, you may want to install the Change Management template to benefit from the full set of change processes. See Change management for more information on the workspaces and processes in this template.
However, there is some preparation you must do before you can install the Change Management template and steps you should follow to insure it has been installed correctly. Follow this guide to ensure a successful integration.
Requirements
To perform the actions in this guide, you must be the administrator of your Fusion hub and Fusion Manage site.
Prepare your Fusion Manage site prior to installation
Ensure all change orders in progress are complete.
Ensure your team has read-only access to current Change Orders workspace. This is so that they can still refer to past COs if required. See Manage PLM workspace access for more information.
From the Fusion web client, click your profile menu and select Admin.
Open the Groups tab.
Select the Everyone (System) group.
In the group focus panel on the right, go to the Add PLM workspace access section.
For the Change Orders workspace, click the roles drop-down to select the Viewer [Change Orders] role and unselect the Editor [Change Orders] role.
Note: Your role names might be different. In this step, you want to make sure you remove any editing capabilities from your team so they cannot create any new COs in the Change Orders workspace.Repeat these steps for any additional groups that have edit access to the Change Orders workspace, if applicable.
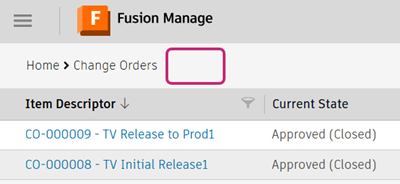
Your team will no longer be able to create new change orders in the Change Orders workspace. To confirm this, in Fusion Manage, navigate to Workspaces > Change Management > Change Orders workspace. Notice the Create
 icon is not available. You will also be unable to create a CO from the Fusion desktop client.
Rename the Change Management workspace category. For example, rename it to
Legacy_Change Management. See Main Menu Designer for more information on how to do this.From the Fusion Manage navigation menu, select PLM Settings > System Configuration > Main Menu Designer.
Next to the Change Management category, click Edit
 .
.Rename the category to
Legacy_Change Management.Click Save.
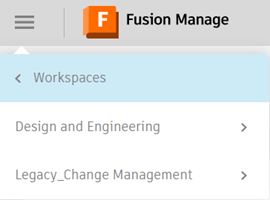
The category name is now changed. To confirm this, refresh the page, then select the navigation menu > Workspaces and notice the category now shows as Legacy_Change Management.
Rename your current Change Orders workspace. For example, rename it to
Legacy_Change Orders. See Workspace Manager for more information on how to do this.From the Fusion Manage navigation menu, select PLM settings > Workspace Manager.
Expand Change Orders and select Workspace Settings.
Rename the workspace to
Legacy_Change Orders.Note: The Workspace ID will remain asWS_CHANGE_ORDERS.Click Save.
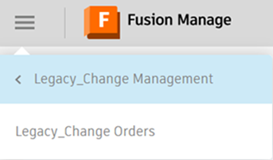
The workspace name is now changed. To confirm this, refresh the page, then select the navigation menu > Workspaces > Legacy_Change Management and notice the workspace name is now Legacy_Change Orders.
Rename the existing Change Order roles. For example, rename them to include
Legacyin the name. See Manage Roles for more information on how to do this.From the Fusion Manage navigation menu, select PLM Roles.
Next to the Editor [Change Orders] role (or similarly named role), click Edit.
Append the prefix
Legacy_to the role name and description.Click Save.
Repeat these steps for all other Change Order roles you may have.
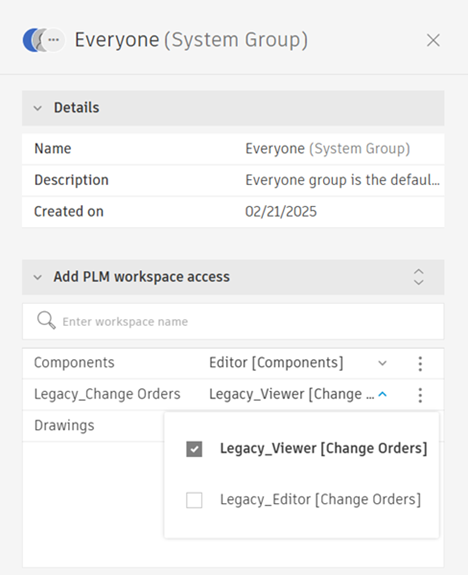
The role names have now changed. To confirm this, open the Hub Admin setting > Groups tab. Select the Everyone (System) group and notice in the PLM workspace access section that it now shows Legacy_Viewer [Change Orders] role assigned to the Legacy_Change Orders workspace.
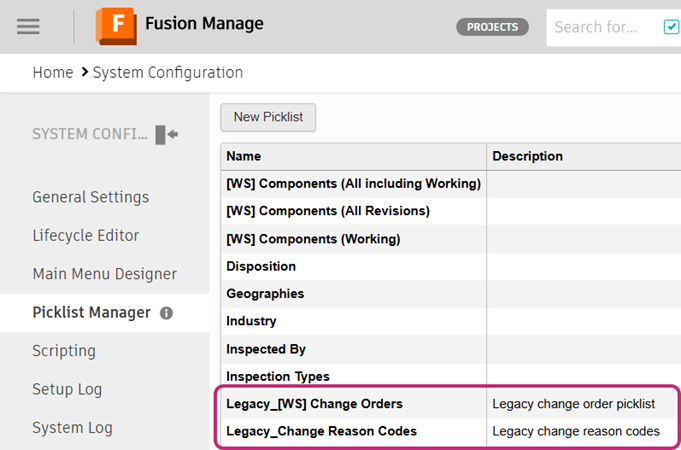
Rename these picklists:
- Change Reason Codes
- [WS] Change Orders
For example, rename them to include
Legacyin the name. These picklists are also included in the Change Management template, so rename them to avoid confusion.From the Fusion Manage navigation menu, select PLM Settings > System Configuration > Picklist Manager.
Next to the Change Reason Codes picklist, click Edit.
In the Picklist Name box, append
Legacy_to the picklist name.Click Save.
Repeat these steps for the [WS] Change Orders picklist.
(Optional) Edit or add a description to the picklist.
Install the Change Management template
Install the Change Management template. This installs a new Change Orders workspace that comes with a new workflow and fields, and is integrated with the additional change management workspaces including Problem Reports, Change Requests, Change Tasks, and Change Approval Templates.
From the Fusion Manage navigation menu, select PLM Settings > Template Library.
Click Change Management.
Click Install.
From the Installation Summary: Change Management dialog, review the objects that are about to be installed. In particular, notice if there are any objects with
_1appended to the end. This can help you determine if you forgot to rename something.Note: The workspace ID cannot be changed but this does not matter. The template still installs without issue.Click Install.
The Change Management template is now installed.
Configure the Change Management template
For the Change Orders, Change Requests, Change Tasks, and Problem Reports workspaces, set up workspace relationships from the Managed Items tab to the Components and Drawings workspaces. This enables each change process to add items from these two workspaces to their Affected Items tab and means the processes appear in the Change Orders tab for Components and Drawings as well. See Set up workspace relationships for more information.
Note: The linked help page refers to the Items workspace. Instead, you should link to the Components and Drawings workspaces.From the Fusion Manage navigation menu, select PLM Settings > Workspace Manager.
Expand Change Orders and select Workspace Relationships.
Add relationships for the Managed Items tab the to the Components and Drawings workspaces. Do not remove any existing relationships.

Click Save.
Repeat these steps for the Change Requests, Change Tasks, and Problem Reports workspaces.
Add transitions to the lifecycle editor for the installed Change Orders workspace. See Add transitions to the lifecycle editor.
From the Fusion Manage navigation menu, select PLM Settings > System Configuration > Lifecycle Editor.
In the Workspace Highlight and Mapping section, select Change Orders.
Highlight all values in the Available list and move them to the Selected list.
 Note: Refer to the Legacy_Change Orders selected list to ensure you copy it exactly.
(Optional) For the Change Orders, Change Requests, and Problem Reports workspaces, configure the Affected Item field in the Item Details Tab to be the Pick List type to select items from the Components workspace. See Set up item picklist fields for more information.
From the Fusion Manage navigation menu, select PLM Settings > Workspace Manager.
Expand Change Orders and select Item Details Tab.
In the Details section, for the Affected Items field, click Edit
 .
.In the Field description box, remove or change the description of the field.
Click the Data Type drop-down and select Pick List.
From the Pick List Options drop-down, select [WS] Components (All including Working).
Set the Display width to
100, then click Save.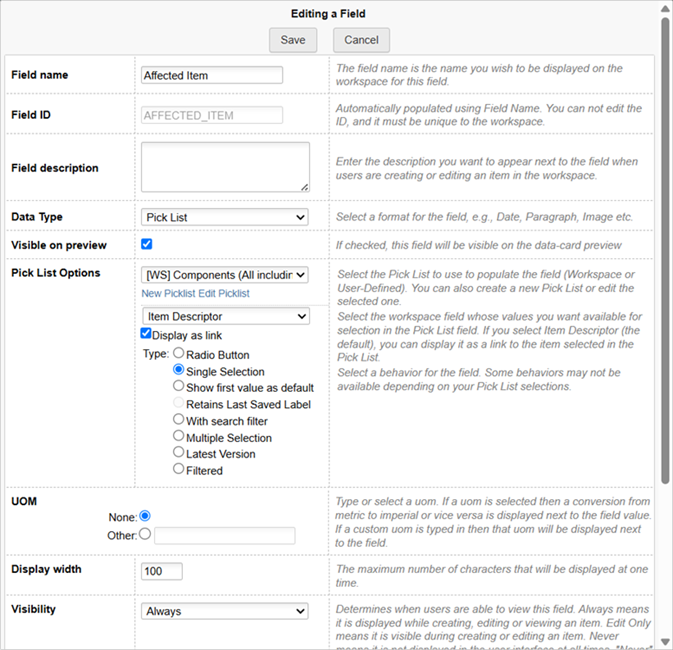
Repeat for the Change Requests and Problem Reports workspaces.
(Optional) For the Change Orders and Change Tasks workspaces, configure the Items to Change field to be the Pick List type to select multiple items from the Components workspace. See Set up item picklist fields for more information.
Note: For Change Tasks, this field is found in the Item Details Tab. For Change Orders, this field is found in the Grid Tab.From the Fusion Manage navigation menu, select PLM Settings > Workspace Manager.
Expand Change Orders and select Grid Tab.
For the Items to Change field, click Edit
 .
.Click the Data Type drop-down and select Pick List.
From the Pick List Options drop-down, select [WS] Components (Working).
For the Type, select Multiple Selection.
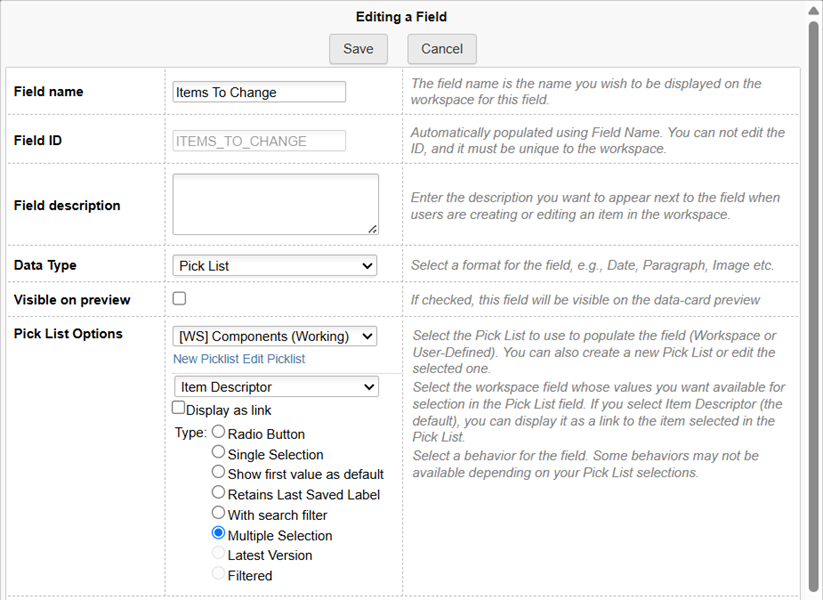
Click Save.
Repeat for the Change Tasks workspace.
Note: You can choose the [WS] Components (All including Working) picklist when configuring this field for change tasks but it must be the [WS] Components (Working) picklist for change orders.
(Optional) For the Change Orders and Change Tasks workspaces, configure the Reference Items field to be the Pick List type to select multiple items from the Components workspace.
Note: For Change Tasks, this field is found in the Item Details Tab. For Change Orders, this field is found in the Grid Tab.- From the Fusion Manage navigation menu, select PLM Settings > Workspace Manager.
- Expand Change Orders and select Grid Tab.
- For the Reference Items field, click Edit
 .
. - Click the Data Type drop-down and select Pick List.
- From the Pick List Options drop-down, select [WS] Components (All including Working).
- For the Type, select Multiple Selection.
- Click Save.
- Repeat for the Change Tasks workspace.
Change the number assigned to COs created in the new Change Orders workspace to distinguish them from COs created in the Legacy_Change Orders workspace.
From the Fusion Manage navigation menu, select PLM settings > Workspace Manager.
Expand Change Orders and select Item Details Tab.
Next to the Number field, click Edit
 .
.In the Computed Field Formula box, change the number to something of your choosing. For example, you might change the prefix to
ECOinstead.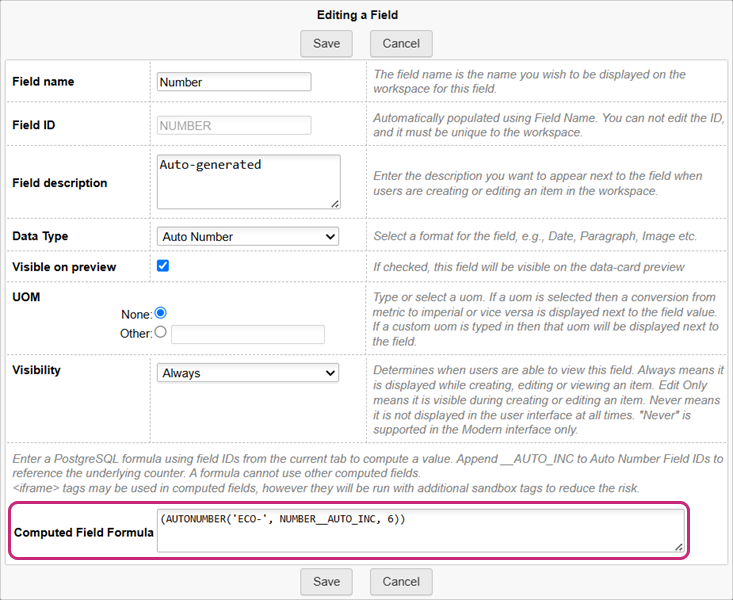
Click Save.
(Optional) Use the Main Menu Designer to re-arrange the Workspaces menu as you see fit. See Main Menu Designer for more information on how to do this.
Test the Change Management installation in the Fusion Manage site
Test that the new change management processes work in the Fusion Manage site only for now.
Assign roles to a test user group. See Manage PLM workspace access.
Work through the full change management process from problem reports to change orders in the Fusion Manage site only. See Change management for more information on each workspace.
Tip: Use these tutorials to guide you, starting at Tutorial 6.Adjust any settings as necessary.
Set the revisioning workspace and perform a final test
Configure the Fusion desktop client to create change orders in the newly installed Change Orders workspace.
Note: Once you do this, all new change orders will be associated with the new Change Orders workspace.From the Fusion Manage navigation menu, select PLM Settings > System Configuration > General Settings.
Navigate to the Fusion Integration section.
Click the Revisioning workspace linked to Fusion drop-down menu and select Change Orders.
Click Save.
 Note: See General Settings Reference for more information on this setting.
Test that you are able to create change orders from the Fusion desktop client and work through the full change management process again.
Tip: Use these tutorials to guide you.
Once the full change management workflow has been successfully validated, create groups and assign roles as necessary to make it available to your team.
