
When using PartMaker/Turn-Mill, the following options are available on the Set Modes dialog:
Main Spindle Mode
Specify how the main spindle machines the process:
- Idle (MO) — Select if the main spindle is not used during machining.
- Machining with One Tool (M1) — Select if the main spindle uses one tool during machining.
- Machining with Two Tools (M2) — Select if the main spindle uses two tools during machining.
Sub-Spindle Mode
Select how the sub-spindle machines the process:
- Idle (S0) — Select if the sub-spindle is not used during machining.
- Follow Support (SF) — This option is not available in PartMaker/Turn-Mill.
- Part Support (SP) — Select if the sub-spindle supports the part during machining.
Note: Select this option, together with Cutting With One Tool (M1) for the main spindle, for cut-off processes (M1SF).
- Machining with One Tool (S1) — Select if the sub-spindle uses one tool during machining.
- Machining with Two Tools (S2) — Select if the sub-spindle uses two tools during machining.
- Double-Ended Drilling (SD) — This option is not available in PartMaker/Turn-Mill.
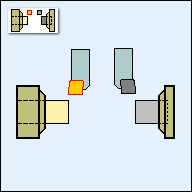
Graphical representation of Synchronization Mode
The top right-hand area of the dialog contains a graphical representation of the Synchronization Mode, which updates to reflect your selections for Main Spindle Mode and Sub-Spindle Mode.
The tool in use during the process is shown in yellow. The tool that is not cutting is shown in gray. For example:
Other options
The following options are also available:
- Modify Mode for Current Process Only — Select this option to apply your selections to the current process only.
- Modify Modes for all Consecutive Processes with Same Mode — Select this option to apply your selections to all consecutive processes with the same Synchronization Mode.
- New Sync Group — Select this option to split an existing Synchronization Group into two groups, by creating a new Synchronization Group.
This option is available for processes that use the M2S0, M2SP, or M0S2 Synchronization Mode and is available for the third and subsequent processes in the current Synchronization Group. For example:
- Click the Set Modes button for the third process in the following Synchronization Group to display the Set Modes dialog, and then select the New Sync Group option:
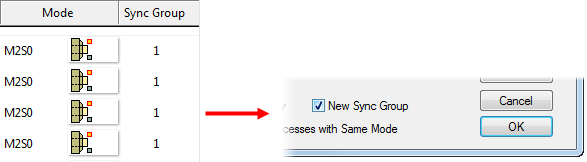
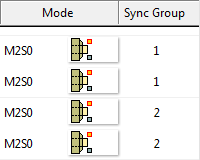
- Close the Set Modes dialog, and then click the Synchronize button in the Process Table window. PartMaker reorganizes the processes into the following Synchronization Groups:
PartMaker expects each Synchronization Group to use two different turrets as the Primary and Secondary tool posts. If you create a new Synchronization Group that does not use two different turrets, PartMaker displays a warning.
When you have selected the New Sync Group option for a process, the option becomes unavailable. If you want to make the option available again, re-generate the Process Table and ensure that the Retain Process Table Modifications option is not selected.
- Click the Set Modes button for the third process in the following Synchronization Group to display the Set Modes dialog, and then select the New Sync Group option:
- Eject Part (E) — Select this option to eject the part from the sub-spindle at the end of the process. You would usually select this option for the last process machined on the sub-spindle. You can set this option automatically for the last process on the sub-spindle, by selecting the Eject Part After Last Sub-Spindle Process option on the Process Table Options dialog.
- Sub-Spindle Grip Z-Coordinate (Zg) — Enter the Z position at which the sub-spindle grips the part.
User Data — Click to display the User Data dialog, where you can specify custom data (known as User Data) for the current Post Configuration file.